The Ultimate Rash Detector App User Guide for Beginners
Discover how to install, set up, and use a rash detector app with our beginner’s guide. Get tips on interpreting results and optimizing performance.
Estimated reading time: 8 minutes
Key Takeaways
- Convenient self-assessment from home
- Immediate AI-powered feedback on possible skin issues
- Privacy-first on-device processing options
- Guided decision-making for when to consult a professional
Table of Contents
- Section 1: Getting Started
- Section 2: Using the Rash Detector App
- Section 3: In-Depth Look at Features
- Section 4: Troubleshooting
- Section 5: Additional Tips and Best Practices
- Conclusion
- FAQ
Section 1: Getting Started
Kick off your rash detection journey with a smooth setup.
1. App Installation
- Open the Apple App Store or Google Play Store.
- Search for reputable apps such as Rash ID or Ask Aysa.
- Verify developer credentials—look for medical or tech companies.
- Read user reviews to confirm reliability.
- Tap “Install” or “Get” to download the app.
2. Initial Setup
- Launch the app after installation.
- Create an account: enter your name, email, and a secure password.
- Optionally provide basic health details (age, known allergies) for personalized analysis.
- Use guest mode (if available) for added privacy.
- Grant camera and photo-library permissions when prompted.
3. User Interface Basics
- Home screen typically shows:
- Camera icon to capture new rash photos
- Gallery icon to upload existing images
- “Start Scan” or “Analyze” button
- Menu (hamburger) icon for settings
- Info icon for help and tutorials
- Tap the camera icon to launch in-app camera mode.
- Use the bottom-navigation bar or side menu to access history, settings, and privacy controls.
Section 2: Using the Rash Detector App
Follow these steps to capture and analyze a rash accurately.
1. Step-by-Step Instructions
- Capture an Image
- Position your smartphone 6–8 inches from the rash.
- Ensure the rash fills at least 50% of the frame.
- Use the in-app grid overlay for proper alignment. (See photo tips.)
- Tap the shutter button to capture a clear photo.
- Initiate Analysis
- Tap “Analyze” or the checkmark icon.
- Confirm adequate lighting and keep the phone steady.
- The AI or cloud engine begins processing.
- Answer Symptom Questions
- Respond to prompts about onset, itchiness, pain level, location, and recent exposures.
- View Results
- Review a list of possible skin conditions.
- See a severity rating (mild, moderate, severe).
- Get recommended next steps: self-care tips or professional consultation.
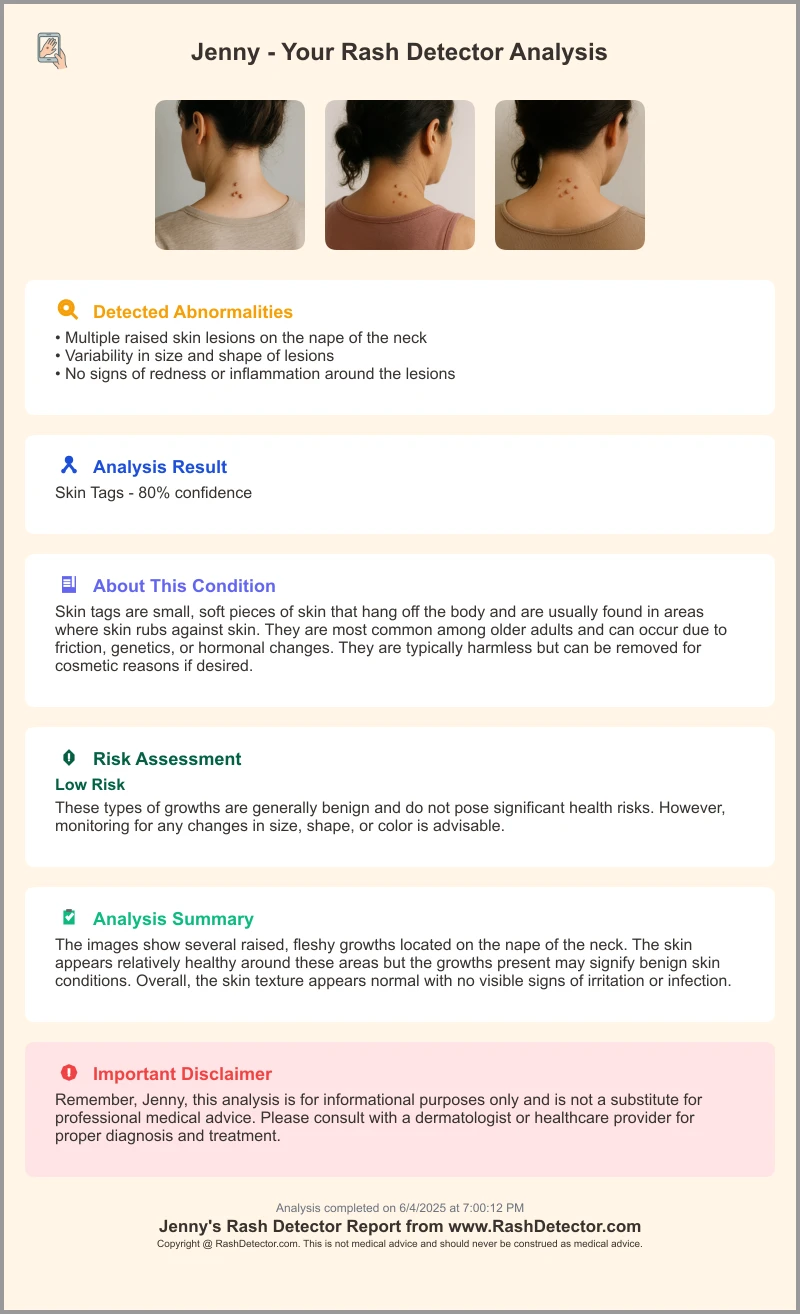
For example, using Rash Detector, you’ll receive a detailed sample report like this:
2. Key Features Explained
- Image Capture: built-in camera with flash control, zoom, and focus lock
- Instant Analysis: on-device AI or secure cloud returns results in under 30 seconds
- Personalized Guidance: follow-up prompts tailor advice; option to export a PDF summary
3. Tips to Optimize Performance
- Use natural daylight or bright indoor lighting; avoid harsh shadows.
- Keep the camera lens clean.
- Hold the phone with both hands or use a stand to reduce blur.
- Remove clothing or jewelry covering the rash area.
- If analysis confidence is below 80%, reposition and reshoot the image.
Section 3: In-Depth Look at Features
Understand the tech behind the app’s accuracy.
1. Detection Technology Simplified
- AI Algorithms: trained on over 100,000 images; use convolutional neural networks (CNNs)
- Machine Learning Models: continuously improve as users share images and confirm diagnoses
Read more in the AI dermatology preview.
2. Assessment Process Details
- Metrics Evaluated: color contrast, border irregularity, size in millimeters, distribution symmetry
- User Input Integration: combines image metrics with your age, medical history, and symptom onset
3. Interpreting Results
- Possible Conditions vs. Diagnosis: app lists likely issues but does not replace a doctor’s assessment
- When to Seek Help: spreading rash, bleeding, or fever → seek immediate care
- Saving and Sharing: save results in-app or export a PDF/image summary
Learn more about interpreting rash diagnosis scores.
Section 4: Troubleshooting
Quick fixes for common hiccups.
- Blurry Images → clean lens, hold phone steady, use grid overlay
- Poor Lighting → move to a brighter area, enable torch or flash
- App Crashes → restart app, update to the latest version, clear cache
- Permissions Denied → Settings > App Permissions > enable camera & storage
- Slow Analysis → check internet; switch between on-device and cloud modes
Section 5: Additional Tips and Best Practices
Maximize accuracy and protect your privacy.
- Use the app in well-lit, private spaces to safeguard your data and improve image clarity.
- Re-scan periodically to track rash progression; compare saved images over time.
- Maintain a symptom log: date, time, itchiness level, any new triggers.
- Consult reputable resources for deeper learning: American Academy of Dermatology.
- Do not rely solely on the app in emergencies or severe allergic reactions.
Conclusion
This guide has walked you through:
- Installing and verifying a rash detector app
- Capturing clear rash images and initiating AI-powered analysis
- Understanding underlying technology and interpreting results
- Troubleshooting common issues quickly
- Applying best practices for privacy, tracking, and accuracy
With these steps, you can perform quick self-assessments, protect your data, and get guidance on next steps. Remember, this tool complements but does not replace professional medical care.
FAQ
Q: Is my data secure?
A: Most apps process images on your device and don’t upload personal data. Always review the privacy policy.
Q: Can it diagnose skin cancer?
A: No. Apps offer informational guidance on common rashes. Always consult a dermatologist for serious concerns.
Q: What conditions are covered?
A: Common rashes, insect bites, dermatitis, fungal infections. Accuracy varies by condition.
Q: Is there a subscription fee?
A: Basic scans are free. Advanced features or unlimited reports may require a premium plan.